

 By
By Gymnastics are one of the best forms of exercises which build strength , balance and flexibility.
Many of the gymnastics exercises can be performed at home with little or no equipment.
In this guide, we’ll cover seven of the best gymnastics exercises, explain how to perform each one, highlight their benefits, and recommend sets and repetition.
1. Hollow Body Hold
How to Do It
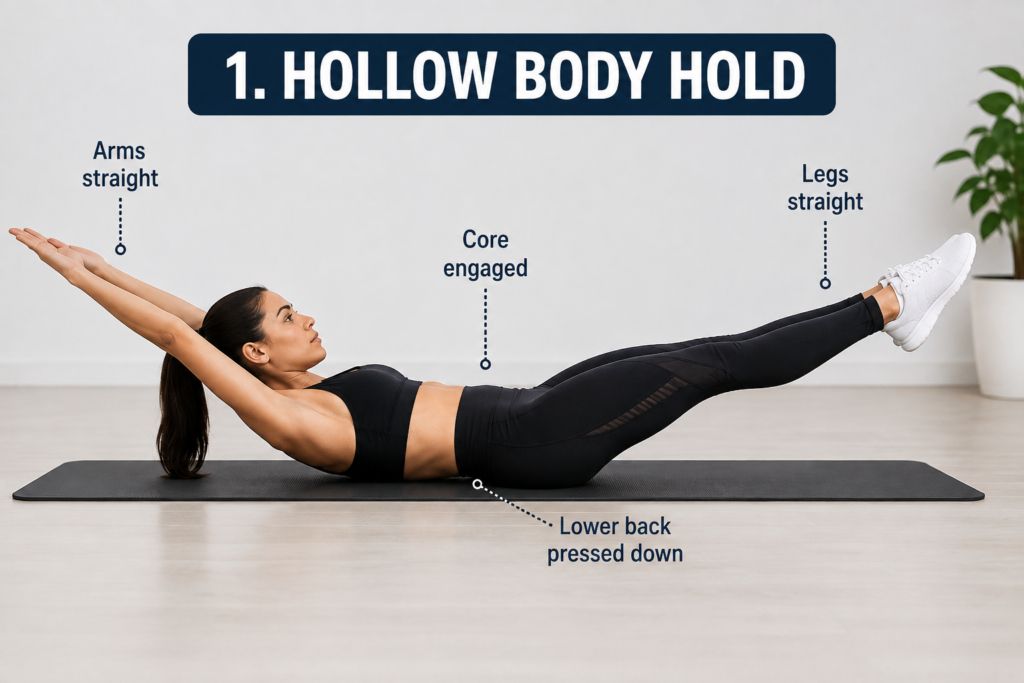
- Lie flat on your back with your arms extended overhead and your legs straight.
- Tighten your abdominal muscles and press your lower back firmly into the floor.
- Lift your shoulders and arms a few inches off the ground.
- Raise your legs about 6-12 inches while keeping them straight.
- Hold the position, breathe normally, and keep your body as still as possible.
Benefits
- Strengthens the core muscles
- Improves balance and body control
- Enhances posture and stability
- Builds a strong foundation for advanced gymnastics skills
- Supports better performance in calisthenics and functional fitness
Sets and Duration
- Beginners: 3 sets of 15-20 seconds
- Intermediate: 3 sets of 30-40 seconds
- Advanced: 3-4 sets of 45-60 seconds
Tips
- Keep your lower back pressed against the floor throughout the exercise.
- Avoid lifting your legs too high, as this reduces the challenge to your core.
- Breathe steadily instead of holding your breath.
- If the full version is too difficult, bend your knees slightly until your core becomes stronger.
2. Handstand Hold
How to Do it
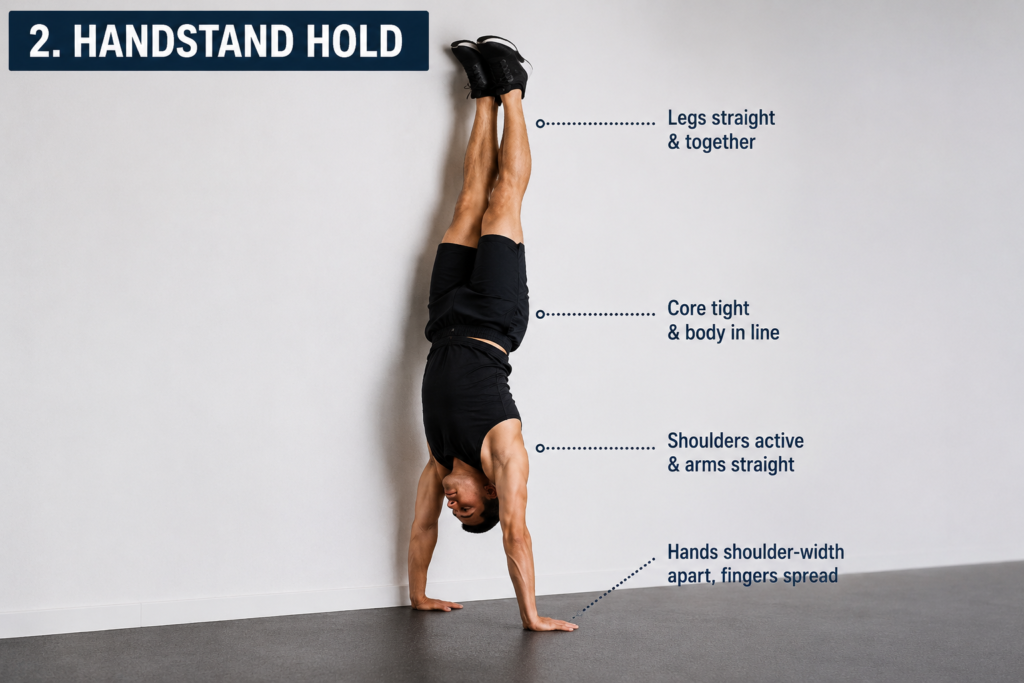
- Stand facing a wall and place your hands shoulder-width apart on the floor.
- Kick one leg up, followed by the other, until your heels lightly touch the wall.
- Keep your arms straight and your shoulders engaged.
- Tighten your core and glutes to keep your body in a straight line.
- Hold the position while breathing steadily, then lower one leg at a time.
Benefits
- Strengthens the shoulders, arms, and wrists
- Builds core stability and body control
- Improves balance and coordination
- Enhances posture and body alignment
- Prepares you for advanced gymnastics skills
Sets and Duration
- Beginners: 3 sets of 10-20 seconds
- Intermediate: 3 sets of 20-40 seconds
- Advanced: 3-4 sets of 45-60 seconds
Tips
- Warm up your wrists and shoulders before practicing.
- Keep your elbows locked but not overly stiff.
- Look at the floor between your hands instead of looking forward.
- Practice against a wall until you can comfortably maintain your balance.
3. Pistol Squat
How to Do It
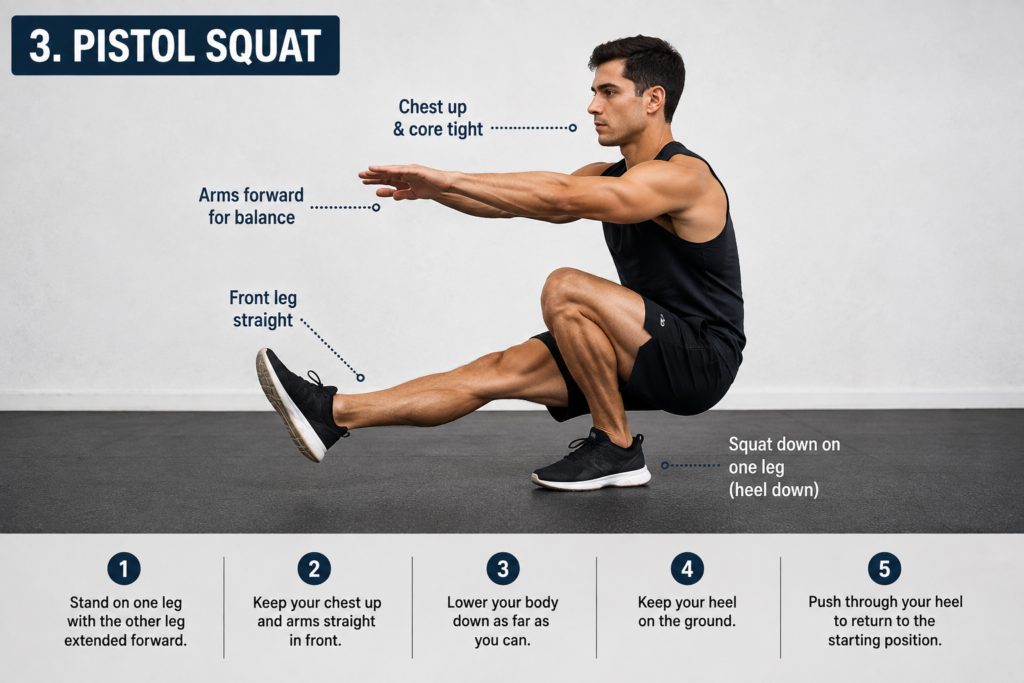
- Stand on one leg with your other leg extended straight in front of you.
- Keep your chest up and engage your core for balance.
- Slowly lower your body by bending the standing leg while keeping the other leg off the ground.
- Descend until your thigh is as low as your mobility allows.
- Push through your heel to return to the starting position.
- Repeat on the opposite leg.
Benefits
- Builds strength in the legs and glutes
- Improves balance and coordination
- Increases hip, knee, and ankle mobility
- Strengthens the core for better stability
- Helps correct strength imbalances between both legs
Sets and Repetitions
- Beginners: 3 sets of 3-5 reps per leg (use a chair or support if needed)
- Intermediate: 3 sets of 6-8 reps per leg
- Advanced: 3-4 sets of 8-12 reps per leg
Tips
- Keep your heel firmly on the ground throughout the movement.
- Lower yourself slowly to maintain control and proper form.
- Use a sturdy support or hold onto a pole if you’re learning the exercise.
- Focus on balance and technique before increasing repetitions.
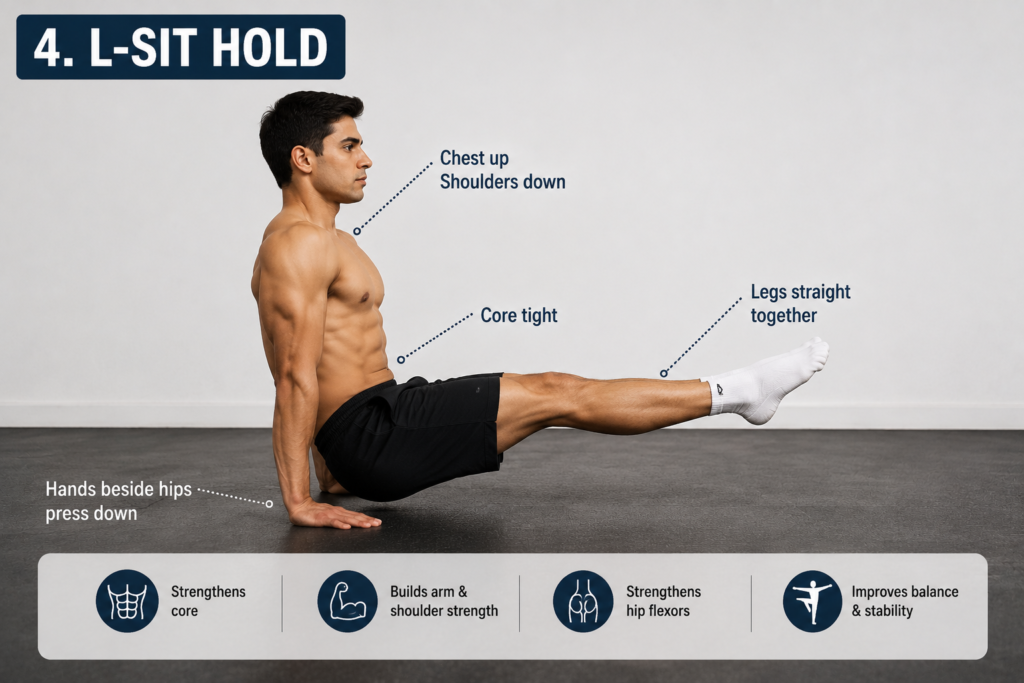
4. L-Shit Hold
How to Do It
- Sit on the floor with your legs straight in front of you.
- Place your hands beside your hips with your palms flat on the ground (or use parallel bars for more space).
- Press your hands firmly into the floor and lift your hips off the ground.
- Keep your legs straight and raised, forming an “L” shape with your body.
- Engage your core, keep your shoulders down, and hold the position while breathing steadily.
Benefits
- Strengthens the core and hip flexors
- Builds shoulder, arm, and triceps strength
- Improves balance and body control
- Enhances posture and stability
- Develops the strength needed for advanced gymnastics and calisthenics skills
Sets and Duration
- Beginners: 3 sets of 5-10 seconds
- Intermediate: 3 sets of 10-20 seconds
- Advanced: 3-4 sets of 20-30 seconds
Tips
- Keep your arms straight throughout the exercise.
- Engage your core to prevent your hips from dropping.
- If the full L-sit is too difficult, start with bent knees and gradually work toward straight legs.
- Focus on maintaining proper form rather than holding the position for a longer time.
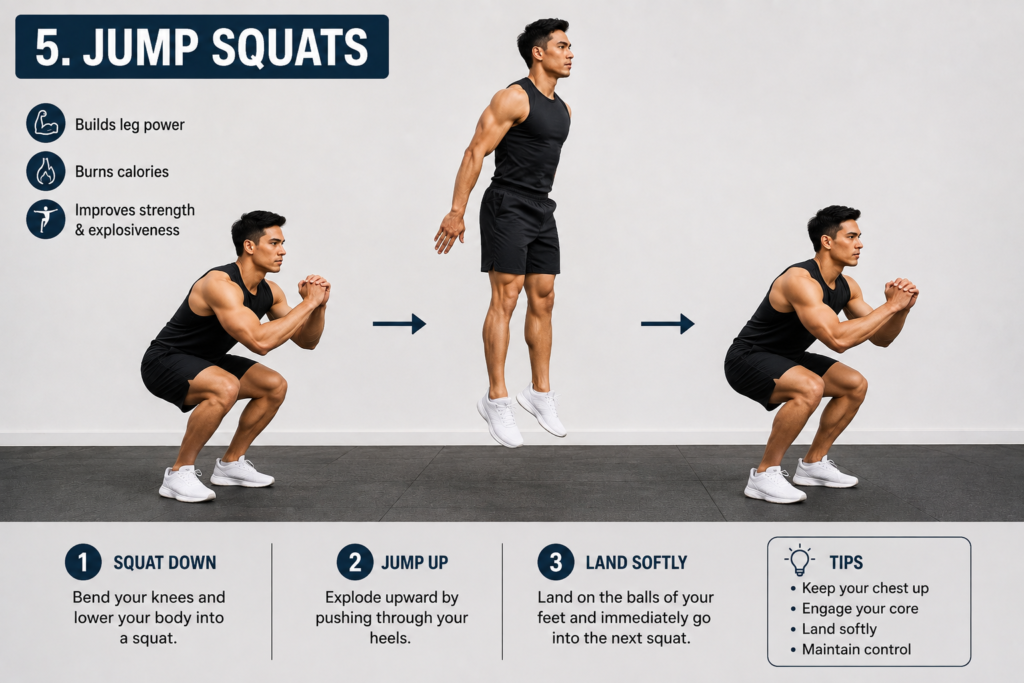
5. Jump Squats
How to Do It
- Stand with your feet shoulder-width apart.
- Lower your body into a squat by bending your knees and pushing your hips back.
- Keep your chest up and your core engaged.
- Explode upward into a high jump by pushing through your heels.
- Land softly on the balls of your feet and immediately bend your knees to absorb the impact.
- Repeat the movement with controlled, smooth repetitions.
Benefits
- Builds explosive leg power
- Strengthens the glutes, quadriceps, hamstrings, and calves
- Improves jumping ability and agility
- Enhances balance and coordination
- Increases overall athletic performance
Sets and Repetitions
- Beginners: 3 sets of 8-10 reps
- Intermediate: 3 sets of 10-15 reps
- Advanced: 4 sets of 15-20 reps
Tips
- Land softly to reduce stress on your knees and ankles.
- Keep your knees aligned with your toes throughout the movement.
- Focus on maximum height while maintaining proper form.
- Rest for 30-60 seconds between sets to maintain explosive power.
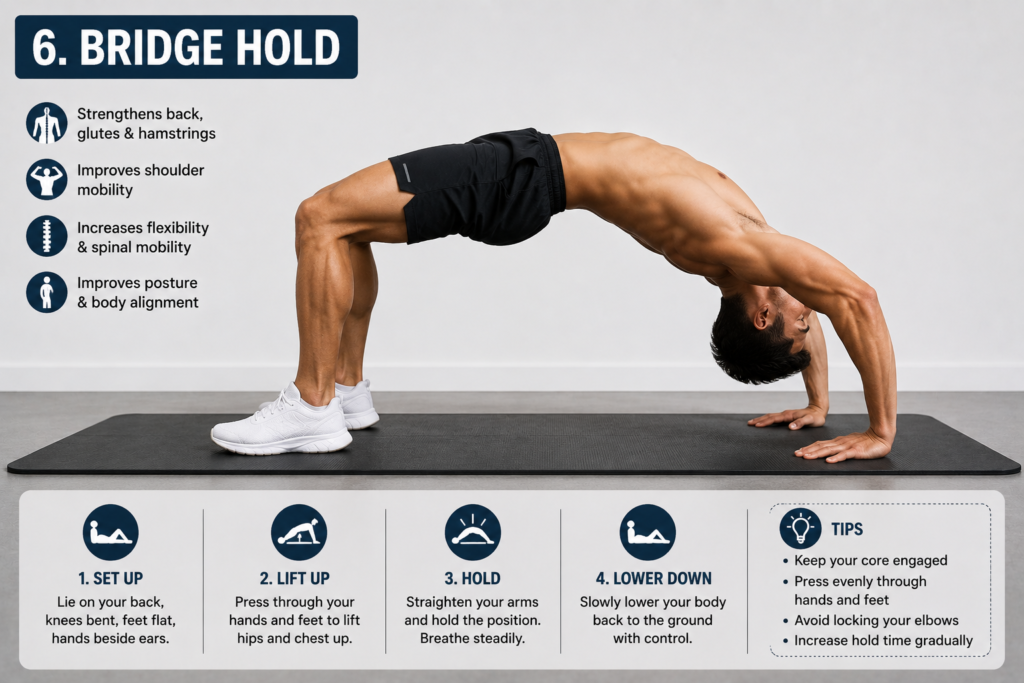
6. Bridge Hold
How to Do It
- Lie on your back with your knees bent and feet flat on the floor, hip-width apart.
- Place your hands beside your ears with your fingers pointing toward your shoulders.
- Press firmly through your hands and feet to lift your hips and chest off the ground.
- Straighten your arms as much as possible while keeping your head relaxed.
- Hold the position, breathe steadily, and slowly lower yourself back to the floor.
Benefits
- Increases flexibility in the spine and shoulders
- Strengthens the back, glutes, and hamstrings
- Improves posture and body alignment
- Enhances shoulder mobility
- Builds the flexibility needed for advanced gymnastics skills
Sets and Duration
- Beginners: 3 sets of 10-15 seconds
- Intermediate: 3 sets of 20-30 seconds
- Advanced: 3-4 sets of 30-45 seconds
Tips
- Warm up your shoulders, wrists, and back before attempting the exercise.
- Press evenly through both hands and feet for better balance.
- Avoid forcing your body into a deep bridge if you feel pain.
- Focus on controlled breathing and gradually increase your hold time as your flexibility improves.
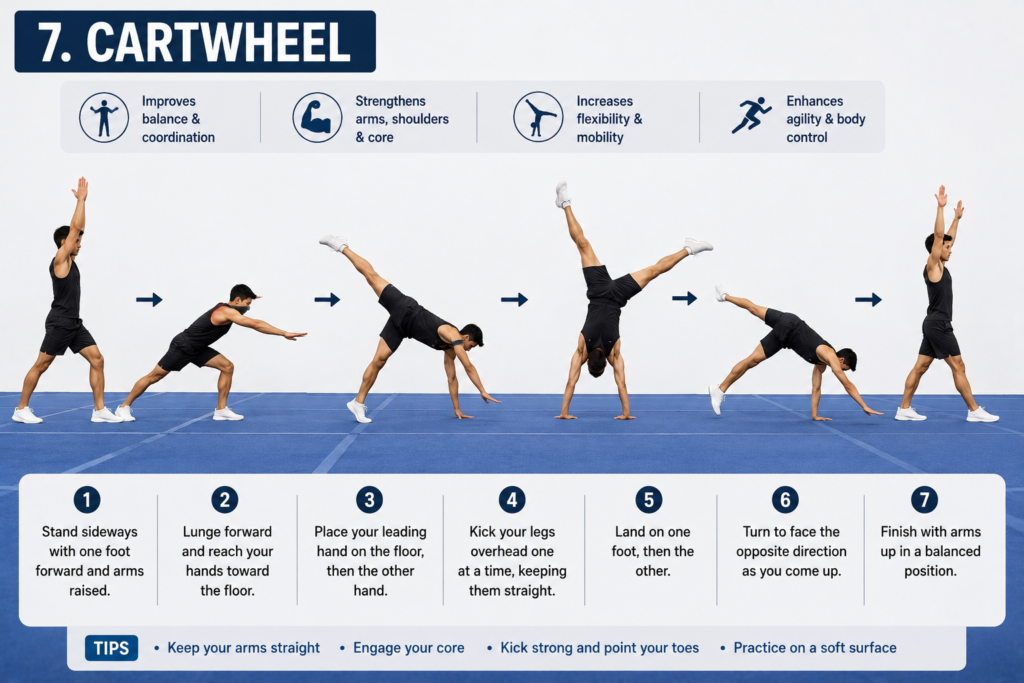
7. Cartwheel
How to Do It
- Stand sideways with one foot slightly in front of the other.
- Raise your arms overhead and engage your core.
- Lunge forward and place your leading hand on the floor, followed by the other hand.
- Kick your legs overhead one at a time, keeping them as straight as possible.
- Land on one foot, then the other, facing the opposite direction.
- Finish with your arms raised overhead in a balanced position.
Benefits
- Improves balance and coordination
- Strengthens the shoulders, arms, core, and legs
- Increases flexibility and mobility
- Enhances agility and body awareness
- Builds confidence for learning advanced gymnastics skills
Sets and Repetitions
- Beginners: 3 sets of 3-5 reps per side
- Intermediate: 3 sets of 5-8 reps per side
- Advanced: 4 sets of 8-10 reps per side
Tips
- Practice on a gymnastics mat or soft surface for safety.
- Keep your arms straight and your core engaged throughout the movement.
- Focus on smooth, controlled motion rather than speed.
- Start with a wide lunge and kick your legs up confidently to maintain momentum.
- If you’re new to cartwheels, practice with a coach or use a wall for support until you gain confidence.
Tips for Safe Gymnastics Training
- Warm up for 5-10 minutes before exercising.
- Practice on a soft mat or padded surface.
- Focus on proper form before increasing difficulty.
- Train consistently to improve strength and flexibility.
- Stop immediately if you feel pain or discomfort.
- Stay hydrated and allow your muscles time to recover.